In one of PHLearn’s PRO Photoshop tutorials, Aaron Nace shows us his techniques and tricks for in-depth skin retouching. In this tutorial, the differences between several different retouching techniques are discussed and demonstrated in detail. You run through everything from basic healing tools, layering, workflow, and detail work with the pen tool. The overall techniques result in a highly refined image that appears both natural and appealing. The 1 and half hour tutorial is designed for individuals that have a beginning knowledge of Photoshop, yet remains relevant for more advanced photoshop artists as well.
Contents
The size of this download is going to take up 193.4 MB and will be in a .zip file. You are going to find 3 main folders:
- 1. Support
2. Tutorial Images
3. Video Tutorial
Along with tutorial, the download contains tutorial images, and help files. The video tutorial folder contains two .mp4 videos that total just under 1 1/2 hours of instruction.
The mp4 format works well with most players and the video/audio quality was clean, even though it had been compressed in the .zip format.
Review
Tone:
As a photographer I have found that I am continually honing my craft through tutorials, books, and pretty much any educational material I can find. Sometimes I will have the materials running in the background as I work on large projects. Because of this constant bombardment of information, I can let you know honestly there is some material out there that is extremely informative, yet extremely tedious. In my case, if I get bored, my mind shuts down and I don’t learn anything. Not the case with this tutorial (or any I have seen by Aaron as a fact). Aaron is great and makes the 1 1/2 hour-long tutorial fly by. You can tell he is having fun and the jovial banter makes the instructional portion hardly feel like work. I always appreciate his style and playful manner. Like I may have said before, it is like learning something new from an old friend. His casual style keeps you relaxed and entertained throughout the videos. As someone who is not new to retouching images in Photoshop, I still learned a few new tricks that I immediately began to apply to my own photos.
As a photographer I have found that I am continually honing my craft through tutorials, books, and pretty much any educational material I can find. Sometimes I will have the materials running in the background as I work on large projects. Because of this constant bombardment of information, I can let you know honestly there is some material out there that is extremely informative, yet extremely tedious. In my case, if I get bored, my mind shuts down and I don’t learn anything. Not the case with this tutorial (or any I have seen by Aaron as a fact). Aaron is great and makes the 1 1/2 hour-long tutorial fly by. You can tell he is having fun and the jovial banter makes the instructional portion hardly feel like work. I always appreciate his style and playful manner. Like I may have said before, it is like learning something new from an old friend. His casual style keeps you relaxed and entertained throughout the videos. As someone who is not new to retouching images in Photoshop, I still learned a few new tricks that I immediately began to apply to my own photos.
Software:
This is one of Aaron’s best selling tutorials. It is a little older so the platform is on Photoshop CS5. The tools used are still present in CS6, so the material remains relevant and useful, especially for a beginner. There are few things that can ruin a good portrait than bad skin retouching technique.
This is one of Aaron’s best selling tutorials. It is a little older so the platform is on Photoshop CS5. The tools used are still present in CS6, so the material remains relevant and useful, especially for a beginner. There are few things that can ruin a good portrait than bad skin retouching technique.
Difficulty:
Aaron’s style is conversational and he explains the “what” and “why” of everything he is doing clearly. This tutorial is geared towards individuals with a basic background understanding of Photoshop. As a “Beginner”, you will be able to understand the different steps he takes and you can always stop and rewind if you missed something. As I said before, if you have an established knowledge of Photoshop there are still a few tricks here that will likely find it’s way into your post-processing workflow.
Aaron’s style is conversational and he explains the “what” and “why” of everything he is doing clearly. This tutorial is geared towards individuals with a basic background understanding of Photoshop. As a “Beginner”, you will be able to understand the different steps he takes and you can always stop and rewind if you missed something. As I said before, if you have an established knowledge of Photoshop there are still a few tricks here that will likely find it’s way into your post-processing workflow.
Favorite Features:
In 1 1/2 hours, a lot of editing material was covered. However, a few points stood out that could easily be applied to several different types of post-processing scenarios.
In 1 1/2 hours, a lot of editing material was covered. However, a few points stood out that could easily be applied to several different types of post-processing scenarios.
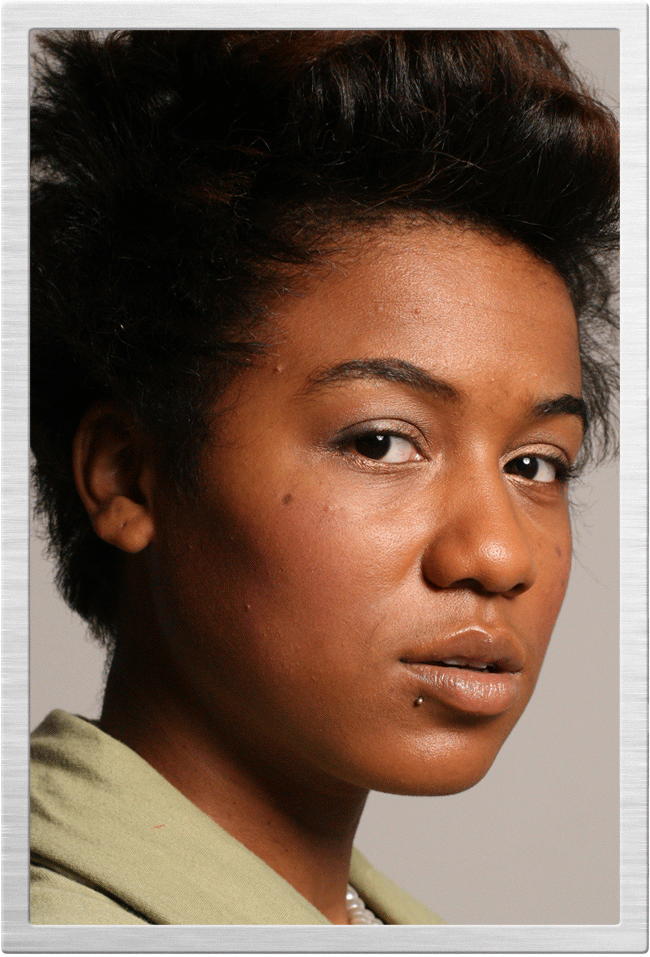
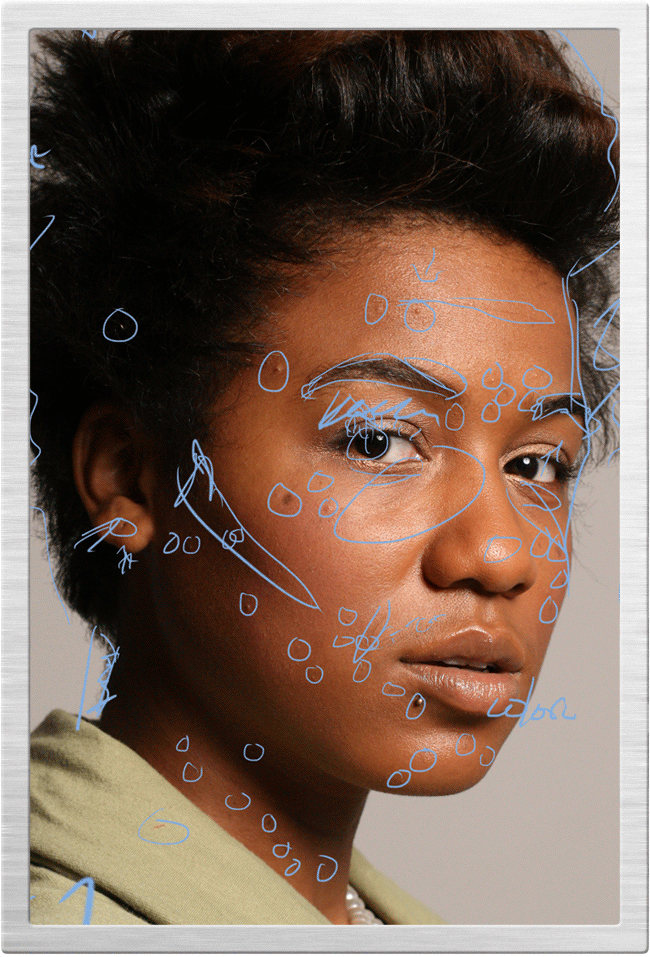
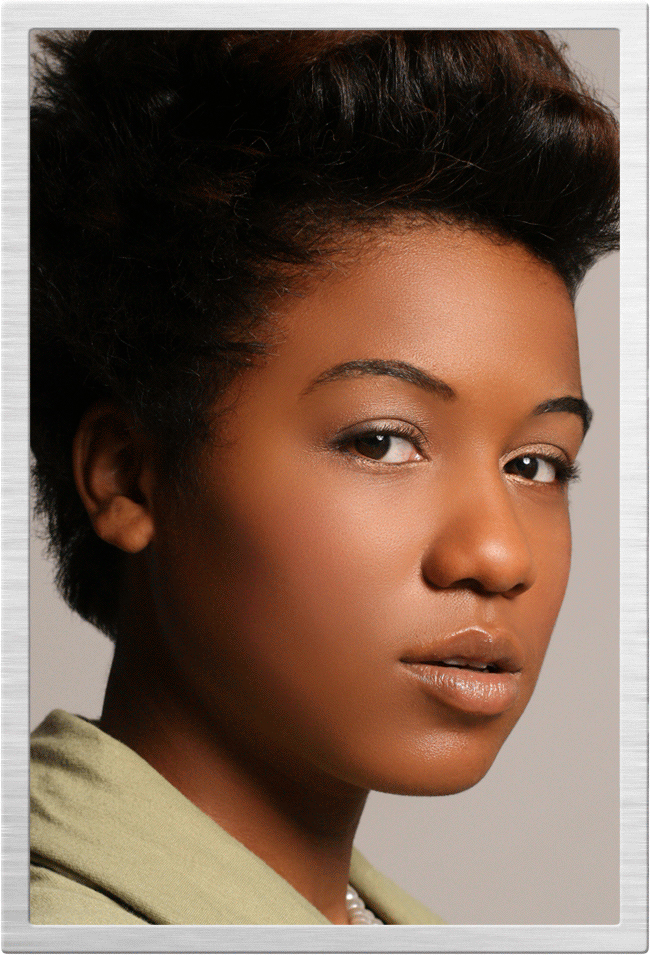
He covers several ways to approach retouch. You get to take a look at his workflow and personal tricks. He covers blemishes, wrinkles, brightening, face contour, sliming the neckline, cleaning the hairline, eye brow reshaping, color corrections, and Photoshop make-up. Move over Mary Kay. He also reviews tools that he believes are best for each different type of job. foto
Aaron also reviews a few problems with general skin retouch versus detail work. He also shows a few ways to retain natural skin texture to avoid the person from looking too “fake” or “plastic”. You will also learn how your lighting will effect the way your skin looks (highlight versus shadow) and ways to mitigate that in post-processing.
Final Thoughts & Conclusion
Each of Phlearn’s tutorials are specific in content and subject. The concise and playful way in which the material is taught is key to their success. If I’m gonna fall asleep during a video, I’m not going to learn much. Simply put, Aaron’s teaching style keeps me engaged and intrigued throughout. The only complaint, if it could be one, would be to shorten the tutorial a bit or break into two sections. I found myself having to step away around the half mark to assist with a client. Not so bad though – all I had to do was press pause.
Another great thing about the PRO Professional Skin Retouch tutorial is that many of the techniques discussed in the videos can be translated into your own workflow and style. Whether it is creating a portrait that is magazine cover ready, or giving a little bump in refinement for your clients, there is plenty of tips to work with.
Until next time . . . .
Stay Inspired ~ Jules
Stay Inspired ~ Jules
good.
ReplyDeletephoto restoration company