WHAT ARE PHOTOSHOP ACTIONS?
Actions are simply recorded tasks in Photoshop that create automated steps or parameters, which once executed, produce desired results depending on the pre-recorded steps they contain. These steps can be quite simple, for example general exposure or contrast adjustments, or something more advanced like the Frequency Separation technique setup.
Some time ago Conny Wallström provided FREE Useful Actions, which can be found here.
These Actions are designed to simply speed up your workflow and make your processing and retouching images more efficient. They give you specific options of what you would like to edit.
If you are not familiar with Actions, and the Actions panel isn’t currently in your Photoshop workspace, you can open it Window menu:

When you first open the Actions panel, there is a default set of Actions already installed in Photoshop.
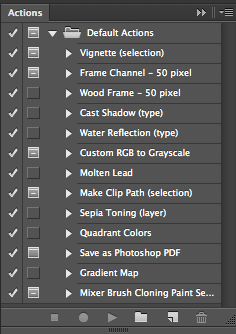
To remove your default set of Actions and start creating your own custom actions, just drag the Default Actions folder onto the Trash Can at the bottom of the Actions palette.
To create a new Action Set, simply click the Folder icon next to the Play button at the bottom of the Actions palette.

To create a new Action simply click the Create New Action icon at the bottom of the Action palette.

Record your own desired adjustments after pressing the Begin Recording button.

Once all the steps of your new Action are completed hit the Stop command to finish recording your custom Action.
Make sure to backup your custom Actions, so you don’t lose them even if your Photoshop crashes, or you get a new updated version installed on your computer. To backup your Actions, select the Action set you’d like to save, go to the drop down (wing menu) of your Actions palette, and select Save Actions. Save these out in your desired location on your hard drive (or external hard drive). Actions are typically saved out as an .atn file.
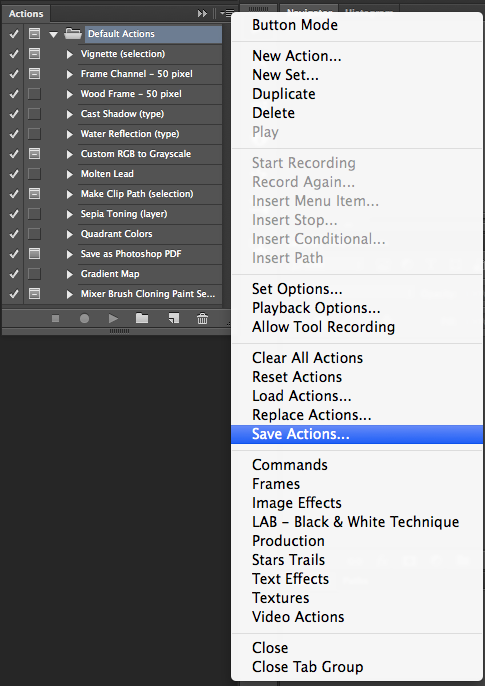
Please be aware that if you do not save your Actions, and Photoshop crashes or becomes unresponsive within the same session (after you created your new Actions), you may lose them for good. Remember to save them out to a desired location right after you created them. Once you have recorded and saved your new custom Action/Actions, close Photoshop and then reopen it. This saves new Actions in the Photoshop memory and in your Workspace.
.
SOME TIPS AND TRICKS WHEN WORKING WITH ACTIONS
TIPS:
- Open your Action palette (drop down menu) and select “Button mode”. This will allow you to instantly play each Action as a button.
- From the Action drop down menu, use “Insert Stop” commands to insert a pause in your Action. This enables you to adjust any settings and then re-press your Action to continue playing. For example, if one of the steps in your custom Action is adding Curves Adjustment layer, most likely you’ll need to adjust the Curve differently for each shot you work on, so inserting a stop will allow you to do that rather than playing the entire Action with pre-set adjustments.
- From the Actions palette drop down menu, click “Insert menu item” when the desired Action is selected – this will allow you to select any desired menu as an adjustment in the middle of a playing Action. For example, if you include insert menu item Gaussian Blur, you will be able to control the desired Radius when the Action is played.
TRICKS:
- When building your Actions, always work non-destructively. Start your custom Actions from creating a duplicate of the background layer, and then build your adjustments on top of it , so that you don’t work on the original background layer.
- As you are writing an Action, which should be run at the very beginning of your retouching, always select the background layer before building new layers or adjustments on top of it. It creates a reference point for the Action to work off.
- Julia’s Tip: When creating a custom Action, which can be used at any point in your retouching workflow (not necessarily in the beginning of your retouch) – start recording this Action by Stamping All Layers (Shift + Option + Command + E or Shift+Ctrl+Alt+E) and re-naming the created stamped layer to something like “base” or “new” in English. These steps have two reasons: 1. No matter at what point you run your new Action – it will use this new layer as a reference point for the following steps. 2. When you rename the created stamp layer, your Action will not have hiccups across multilingual Photoshops versions. This is an important part, if you create Actions which you plan to share or sell in the future.
- Group any important layers together into their own folders in the layer stack. For example, group Adjustments of contrast within its own folder. Keep these layers separate from other Adjustments. Keeping your Layers stack uncluttered and well-organized will help you work efficiently.
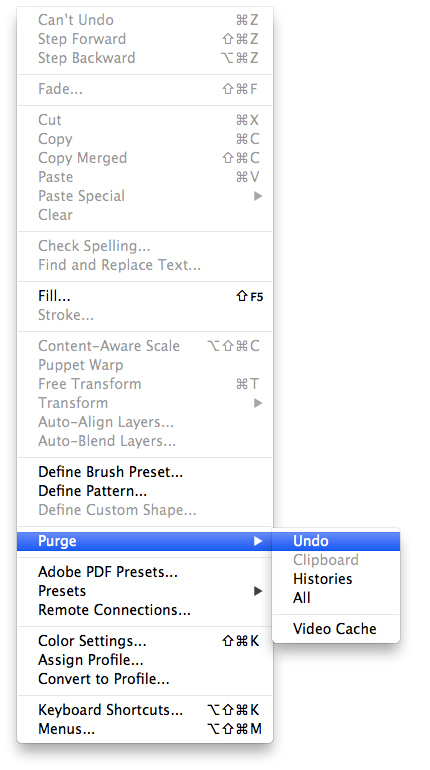
- Insert “Purge” command to reduce History states or memory issues when creating large and complex Actions: Photoshop > Edit > Purge > choose Histories or All
WHAT ARE BATCH COMMANDS?
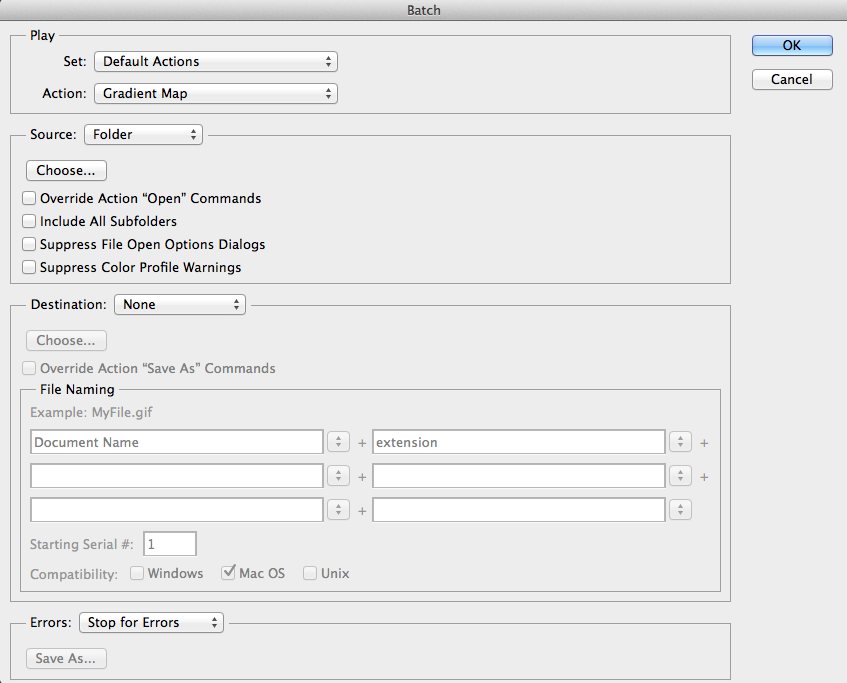
Batch Commands are automated Actions on a global scale both in Photoshop itself as well as in Adobe Bridge. To enable a Batch Command on your Actions simply go to File -> Automate -> Batch.
Click to enlarge:
/
- Set – Choose the set which contains the Action you’d like to run
- Action – Choose the Action you’d like to run for the batch
- Source – Specify files you’d like to process
- Choose – Choose the folder containing the source files
- Override Action Commands – Use source files when opening (select this option if your Action contains an “open” command, and the open commands in your Actions will be ignored).
- Include All Subfolders – Process files in all folders within the specified source folder
- Suppress File Open Options Dialogs – Do not show File Open Options Dialogs
- Suppress Color Profile Warnings – Do not show Color Profile Warnings
- Destination – Final Destination of processed files; Save and Close or to a specific folder.
.
.
WHAT ARE DROPLETS?
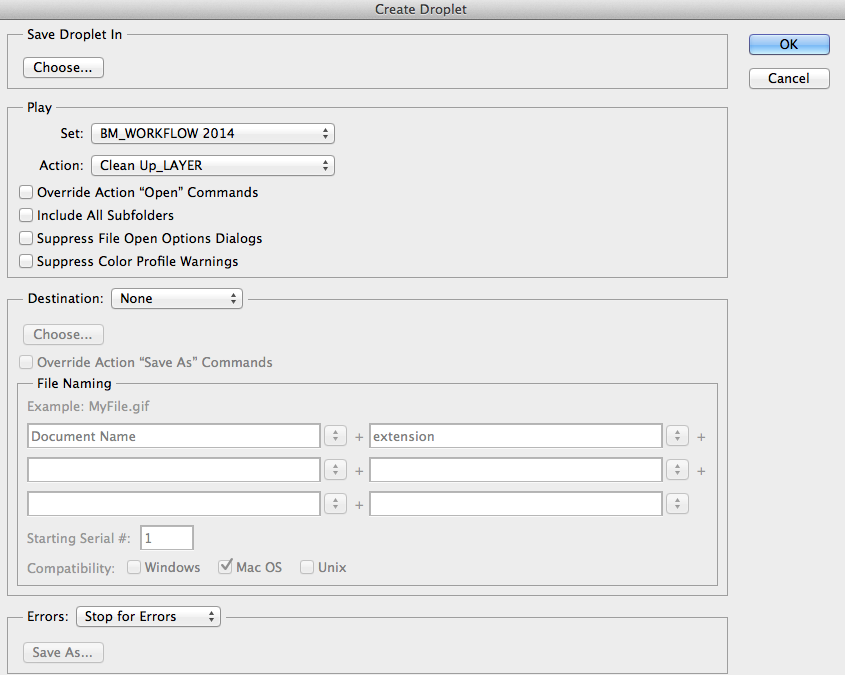
Droplets are simply automated Actions from outside Photoshop. These work similarly to a Batch Command however can be simply run by dragging and dropping any files or folders onto a Droplet icon. To create a droplet simply go to File -> Automate -> Create Droplet
Click to enlarge:
.
- Choose – Specify name and location for Droplet file
- Set – Choose the set which contains the Action you’d like to run
- Action – Choose the Action for the droplet
- Override Action Commands – Use source files when opening (select this option if your Action contains “open” commands. The open commands will be ignored).
- Include All Subfolders – Droplet will process all folders and subfolders within the chosen one
- Suppress File Open Options Dialogs - Do not show File Open Options Dialogs
- Suppress Color Profile Warnings - Do not show Color Profile Warnings
- Destination – Final Destination of processed files; Save and Close or to a specific folder
1
MY PREFERRED SETTINGS WHEN CREATING DROPLETS:
- Save the droplet out on the desktop (or your designated folder for custom Actions) for easy access and use.
- Uncheck or disable Override Action “Open” Commands
- Check or enable Include All Subfolders
- Check or enable File Open Options Dialogs
- Check or enable Color Profile Warnings
No comments:
Post a Comment