Wednesday, February 26, 2014

Automate Your Workflow Using Actions, Batches and Droplets

WHAT ARE PHOTOSHOP ACTIONS?

Blurring-FEATURED-new


Actions are simply recorded tasks in Photoshop that create automated steps or parameters, which once executed, produce desired results depending on the pre-recorded steps they contain. These steps can be quite simple, for example general exposure or contrast adjustments, or something more advanced like the Frequency Separation technique setup.
Some time ago   provided FREE Useful Actions, which can be found here.
These Actions are designed to simply speed up your workflow and make your processing and retouching images more efficient. They give you specific options of what you would like to edit.
If you are not familiar with Actions, and the Actions panel isn’t currently in your Photoshop workspace, you can open it Window menu:
 
Action Window Location
When you first open the Actions panel, there is a default set of Actions already installed in Photoshop.
Default action set
To remove your default set of Actions and start creating your own custom actions, just drag the Default Actions folder onto the Trash Can at the bottom of the Actions palette.
To create a new Action Set, simply click the Folder icon next to the Play button at the bottom of the Actions palette.
create new action set
To create a new Action simply click the Create New Action icon at the bottom of the Action palette.
Create new action
Record your own desired adjustments after pressing the Begin Recording button.
stop record action
Once all the steps of your new Action are completed hit the Stop command to finish recording your custom Action.
Make sure to  backup your custom Actions, so you don’t lose them even if your Photoshop crashes, or you get a new updated version installed on your computer. To backup your Actions, select the Action set you’d like to save, go to the drop down (wing menu) of your Actions palette, and select Save Actions. Save these out in your desired location on your hard drive (or external hard drive). Actions are typically saved out as an .atn file.
save actions
Please be aware that if you do not save your Actions, and Photoshop crashes or becomes unresponsive within the same session (after you created your new Actions), you may lose them for good. Remember to save them out to a desired location right after you created them. Once you have recorded and saved your new custom Action/Actions, close Photoshop and then reopen it. This saves new Actions in the Photoshop memory and in your Workspace.

.

SOME TIPS AND TRICKS WHEN WORKING WITH ACTIONS

TIPS:

  1. Open your Action palette (drop down menu) and select “Button mode”. This will allow you to instantly play each Action as a button.
  2. From the Action drop down menu, use “Insert Stop” commands to insert a pause in your Action. This enables you to adjust any settings and then re-press your Action to continue playing. For example, if one of the steps in your custom Action is adding Curves Adjustment layer, most likely you’ll need to adjust the Curve differently for each shot you work on, so inserting a stop will allow you to do that rather than playing the entire Action with pre-set adjustments.
  3. From the Actions palette drop down menu, click “Insert menu item” when the desired Action is selected – this will allow you to select any desired menu as an adjustment in the middle of a playing Action. For example, if you include insert menu item Gaussian Blur, you will be able to control the desired Radius when the Action is played.

TRICKS:

  1. When building your Actions, always work non-destructively. Start your custom Actions from creating a duplicate of the background layer, and then build your adjustments on top of it , so that you don’t work on the original background layer.
  2. As you are writing an Action, which should be run at the very beginning of your retouching, always select the background layer before building new layers or adjustments on top of it. It creates a reference point for the Action to work off. 
  3. Julia’s TipWhen creating a custom Action, which can be used at any point in your retouching workflow (not necessarily in the beginning of your retouch) – start recording this Action by Stamping All Layers (Shift + Option + Command + E or Shift+Ctrl+Alt+E) and re-naming the created stamped layer to something like “base” or “new” in English. These steps have two reasons: 1. No matter at what point you run your new Action – it will use this new layer as a reference point for the following steps. 2. When you rename the created stamp layer, your Action will not have hiccups across multilingual Photoshops versions. This is an important part, if you create Actions which you plan to share or sell in the future.
  4. Group any important layers together into their own folders in the layer stack. For example, group Adjustments of contrast within its own folder. Keep these layers separate from other Adjustments. Keeping your Layers stack uncluttered and well-organized will help you work efficiently.
  5. Insert “Purge” command to reduce History states or memory issues when creating large and complex Actions:  Photoshop > Edit > Purge > choose Histories or All
Purge

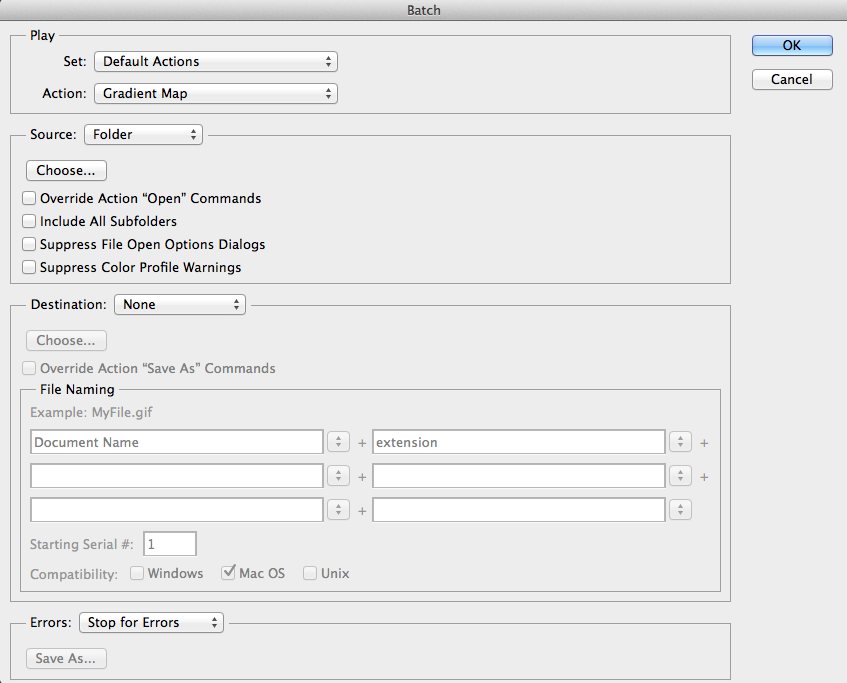
WHAT ARE BATCH COMMANDS?

Batch Commands are automated Actions on a global scale both in Photoshop itself as well as in Adobe Bridge. To enable a Batch Command on your Actions simply go to File -> Automate -> Batch.
Click to enlarge:
/
  1. Set – Choose the set which contains the Action you’d like to run
  2. Action – Choose the Action you’d like to run for the batch
  3. Source – Specify files you’d like to process
  4. Choose – Choose the folder containing the source files
  5. Override Action Commands  – Use source files when opening (select this option if your Action contains  an “open” command, and the open commands in your Actions will be ignored).
  6. Include All Subfolders – Process files in all folders within the specified source folder
  7. Suppress File Open Options Dialogs – Do not show File Open Options Dialogs
  8. Suppress Color Profile Warnings – Do not show Color Profile Warnings
  9. Destination – Final Destination of processed files; Save and Close or to a specific folder.
.
.
WHAT ARE DROPLETS?
Droplets are simply automated Actions from outside Photoshop. These work similarly to a Batch Command however can be simply run by dragging and dropping any files or folders onto a Droplet icon. To create a droplet simply go to File -> Automate -> Create Droplet
Click to enlarge:
.
  1. Choose – Specify name and location for Droplet file
  2. Set – Choose the set which contains the Action you’d like to run
  3. Action – Choose the Action for the droplet
  4. Override Action Commands  – Use source files when opening (select this option if your Action contains “open” commands. The open commands will be ignored).
  5. Include All Subfolders – Droplet will process all folders and subfolders within the chosen one
  6. Suppress File Open Options Dialogs - Do not show File Open Options Dialogs
  7. Suppress Color Profile Warnings - Do not show Color Profile Warnings
  8. Destination – Final Destination of processed files; Save and Close or to a specific folder

1

MY PREFERRED SETTINGS WHEN CREATING DROPLETS:
  • Save the droplet out on the desktop (or your designated folder for custom Actions) for easy access and use.
  • Uncheck or disable Override Action “Open” Commands
  • Check or enable Include All Subfolders
  • Check or enable File Open Options Dialogs
  • Check or enable Color Profile Warnings

Friday, February 7, 2014

The Secret to Crafting Stunningly Sharp Images and Preserving It Across Media

dani diamond fstoppers photography sharp headshot the project

You probably know that getting your uploads to look sharp on screen, in print and on social media goes beyond resizing. Now, resizing is incredibly important in order to retain the optimum quality for sites such as Facebook, but there is an element far deeper than that and it is not often discussed. This is the secret to getting your images looking “sharper” no matter the medium. Specifically when talking about sizing images for Facebook, Trevor Dayley has a great tutorial you can read. What I want to delve into goes into a different direction though, and the techniques can be used no matter where you intend the images to be shown.
I have heard before that my images, once uploaded, look sharp because I shoot with a Nikon D800(images can be found on my FB Page). But it’s important to note that resolution hardly plays a role in the “sharpness” of an image when it is posted onto Facebook. With a D800 the resolution is incomparable, but what that means is that it’s possible to zoom further into the file before seeing pixels, not that the image is sharper.
dani diamond photography model nikon d800 fstoppers sharp nyc photographer fashion 710x1063 The Secret to Crafting Stunningly Sharp Images and Preserving It Across Media
You see, you need to realize that the term “sharpness” has to be understood as an illusion. A person’s eye naturally detects edges to register sharpness, and shadows and highlights in order to record the depth in a subject. In laymen’s terms, what makes something sharp is when there is a light pixel next to a dark pixel and very little grey pixels in between. When using any method of sharpening in post process, in essence all that is being done is taking these edges (the dark pixels and the light pixels) and adding contrast to it. If you were to zoom into a photo at the pixel level and use a sharpening tool, the edges will display signs of higher levels of contrast.
Here is a before/after example:
sharpness contrast dani diamond fstoppers 710x225 The Secret to Crafting Stunningly Sharp Images and Preserving It Across Media
Once the concept and literal meaning of “sharpness” is understood, it can be applied on a much larger scale. Contrast is key in creating images that “pop.” Dark colors need to become darker, light colors need to be lighter and highlights and shadows must be present. The main role of contrast is to give dimension and depth to a photo. And it is these elements that make a photo “pop” and appear sharper. This concept not only applies to portraits, but also to many forms of photography such as, products and landscapes.
contrast dani diamond female model girl fstoppers nyc nikon d800 portrait bokeh eyes 710x533 The Secret to Crafting Stunningly Sharp Images and Preserving It Across Media

I manually dodged and burned the sides of each building. Notice the depth and sharpness in the “after” image.
landscape nikon nyc fstoppers dani diamond sharpen landscape city 710x233 The Secret to Crafting Stunningly Sharp Images and Preserving It Across Media
Study the images of other photographers. You will find that the sharper photos are the ones that have beautiful contrast and depth. In the case of skin, if shadows and highlights are not present, the skin will look flat and that is what the eye understands to be “not sharp.”
Achieving this method of sharpening is more complex than adjusting the contrast slider in Photoshop. Again, it is important to place dark edges next to light edges. It is important to stay conscious of this when shooting. An example, if using a dark backdrop and the subject has dark hair, add a hair light to add separation. Personally, I am a natural light photographer who has a penchant for bokeh. Therefore, I always try to place my subject in accordance to the darkness or lightness of their clothing or hair color. When lighting my subject’s face, it is key for me to have soft shadows in the correct spots, such as the sides of the nose, under the jaw, sides of the forehead and the like. When post processing, accentuating the shadows and highlights through dodging and burning everything from the skin, to the iris of the eye and even the bokeh will undoubtedly give the image a sharper illusion.
sharpen dani diamond fstoppers photography portrait the project 710x250 The Secret to Crafting Stunningly Sharp Images and Preserving It Across Media
It is also important to consider depth of field (DOF) when trying to make an image “pop.” A shallower DOF will result in a popping subject because there is a greater contrast or point of separation between the subject and background.
depth of field dani diamond bokeh fstoppers the project 710x236 The Secret to Crafting Stunningly Sharp Images and Preserving It Across Media
dani diamond the project headshot fstoppers 710x270 The Secret to Crafting Stunningly Sharp Images and Preserving It Across Media

dani diamond fstoppers sharpen 710x522 The Secret to Crafting Stunningly Sharp Images and Preserving It Across Media
Between adding contrast selectively during your editing workflow and applying the appropriate output techniques, your images will look great and stand out in social media, on your website and in print.

Wednesday, February 5, 2014

Retouching Tip | How To Get High Resolution Images

One of the most important aspects in high-end retouching is actually starting off with a high quality image. 


These high resolutions images, aka hires (pronounced high-res), can be in a RAW format, or a high quality 
JPEG. A general rule is that your retouching is as good as your image quality. You can't work on a low 
resolution image and expect high-end results. It's just not possible.


  • How can I get a hires image?
Aside from a high-end camera, good glass and a lighting setup, if you're a photographer, especially if you 
retouch your own images, you'll know you're going to save a lot of time in post if you actually fixed the
 problems during the shoot. And for the photographers who send their photos to a studio for retouching, 
you know you'll be saving a lot of money if you did that.
Bottom line: Fix stuff during the shoot, it'll save you a lot of time + money.

If you're a retoucher, you probably don't have control over the shoot. But you can always work something 
with the photographer.

  • Where do I get hires images?
ModelMayhem
This is by far my favorite website for high resolution images. There's a section dedicated to Digital Art
 and Retouching, and under theChallenges, Contests and Samples section you will find a lot of hires images 
posted by experienced photographers. It's a win win situation; photographers posts their images for retouchers,
 and retouchers get to use them on their portfolio. Just make sure photographer's permission to use the images
 in your portfolio. There is a section for Casting calls as well, where photographers/models look for 
etouchers. If you're in touch with a model, make sure you have the photographer's written permission to 
edit the photo. Sample.

Flickr
Select copyrighted images and make sure you have the photographer's permission as well. Sample.

Deviant Art
dArt is just full of stock images. Make a quick search under stock images. You'll be amazed with the results. 
Make sure you follow the rules as well. Sample.

Stock Exchange
You can find a lot of stock images under the People category, they have a wide closeup collection, great for
 retouching eyes/lips/closeups. Just make sure you follow the original uploader's rules as well. Sample.

Photographers
don't hesitate to contact any photographer directly to work with. If you never ask, you'll never get.

  • What do I need to know about hires images?
Hires files are all over the internet. All the links I provided are perfect for high-end retouching. But it doesn't
 matter, because the real question is: are you allowed to use them? Take copyrights very seriously, especially
 if you're in the united states. Just kidding!!

Portfolio Use
If you want to post your work on the internet. You have to have the photographer's permission. So stay
 away from Google images.

Practicing purposes only
Google is your best friend. You can probably get away with practicing on images off Google. But what's 
the point of wasting 4+ hours on an image that you can't show to anyone or use on your portfolio?