Judging by the popularity of facial retouching software, there
seem to be a lot of people out there who want to make their subjects
look like they just arrived off a private jet from Monte Carlo. And they
want to do it fast, and not get bogged down with little technicalities
like learning how to use Photoshop. So, is it possible to just press a
button and instantly have a complexion that looks like J.Lo after an
hour in the makeup chair? Well, that’s what we’re here to find out, so
let’s take a look.
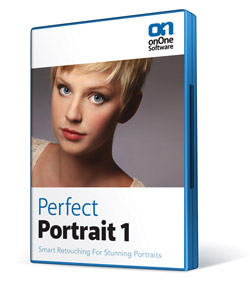
What Perfect Portrait claims to do is to quickly and easily retouch not just one but multiple faces in an image by automatically recognizing not only the faces in the image but the eyes and lips also so they get their own treatment. Of course, if that isn’t to your liking, you can dig deeper into the tools and make manual adjustments. Default settings are those that the manufacturer has determined will work in most situations but you can set your own presets. For example, you may want to go a little heavier on teenage girls than executive men in their 40s, so you can save these settings. There are several presets for Female, Male, Children, and Group already included.
In the suite, you open the program and it goes to the Layers section by default. Then you open an image and use whichever program you’d like. If you opt to go with just Perfect Portrait without the suite, when you open the program you are first asked to open an image and then it opens the image in the program. No big deal, you say? Well, maybe not on the beginning part but each time you are done working on an image, after you save it, the program closes and you have to go through the process again! I found that to be both annoying and slower than just opening images in an already open program.
Let’s go through a sample workflow situation here on a single image using Adobe Lightroom. The program suggests you do any major color corrections and tonal adjustments first in your program of choice, a little strange because then the program will automatically make color adjustments. Maybe the emphasis here is on major. I found the easiest way was to import the file in Lightroom, do any quick adjustments there, then go to Perfect Portrait from the File/Plugin Extras menu. The program will automatically go to work on your image and if you like what you see, you’re done! If you think it should be fine-tuned, choose one of the many presets included under the proper category. For example, if you’re retouching a man’s portrait, there are 12 presets included that range from Default, Elderly, Twilight, Warm, and more. The default menu shows up as a thumbnail bar across the bottom of the program and you can click on and apply whichever one you feel suits the image best. Once you’ve got the basics done, you can either quit there or use the tools to do more work.
One thing I found very useful was the ability to see just what the program was masking out using the Overlay view. Once again, if you are happy with the area the program selected, then leave it alone. If not, you can paint in and out using the Brush tool to have the exact area you want.
When you are done refining your image with the tools, then you advance to the slider menus on the right side of the interface. Also there you’ll find a Navigator and hot keys to select the face magnification, a Layer palette for each face, and sliders for fine-tuning skin color, shine, and other features.
I found the Face Size feature perhaps incorrectly named. Under that menu it lists Small, Medium, Large, and Extra Large, like you’re buying a man’s shirt. When I first saw it, I thought maybe it changed the shape of the face. Not so, as already noted. What it does is define how tightly or loosely you’d like the automatic face detection feature to work. Small will crop in really closely while Extra Large will stray further into the neck, hair, and other features. While I think it’s a good idea, especially if you’re trying to batch process images and don’t want to look at everyone, maybe either a number system or words like Tight or Loose would make more sense.
Let’s take a look now at how Perfect Portrait handles multiple faces in an image. When you open an image with multiple faces, the software automatically detects each face and places it on its own layer. If for some reason it missed a face, usually because it was not facing the camera, you can add the face manually. I did try to see how it would do with an image with 11 faces in a full-length pose. No faces were selected, so there are limits! But I then pulled up an image with three faces and it worked just fine. You can work on each face on its own layer independently.
You also have options when saving the image. You can just hit the Save button and your file will be saved as a PSD layer, your original file on the bottom layer and the retouched file on top. This is in keeping with nondestructive editing so your untouched original can always be accessed. You also have the option of using Export from the File menu to save as a TIFF or flattened JPEG file.
You see, I can open Lightroom, import a folder of images, export them to Perfect Portrait, choose the options I’d like, and press Export once again. Voilà! All images are pretouched. I put four JPEGs in a folder to test and it went through them flawlessly. It did take a little while even with JPEGs so if you have lots of images to do you may want to hit the Export button and then go have your Frosted Mini-Wheats! And speaking of time, I have a rather new computer I used to test this. It has 4GB of RAM and a quad processor so take the minimum specs required pretty seriously, as this program does take some processing power.
Like most current software companies, onOne has extensive support online. They have a Knowledge Base that allows you to search for answers to common questions and e-mail support. They also have a feature I found most useful, onOne University, which has many tutorial videos. Because of the newness of the program, there are only a few on Perfect Portrait, but they do a good job of explaining the basics and will get you up and running quickly.
Note: It is recommended that you use an Intel Core 2 Duo, Xeon, or better processor. In addition, 8GB of RAM is recommended, while 4GB of RAM is the minimum you should use.
Perfect Portrait sells for $99.95, with an upgrade price of $69.95. Perfect Photo Suite 6 sells for $299.95, with an upgrade price of $149.95. For more information, visit onOne Software’s website at: www.ononesoftware.com.

Courtesy of onOne Software
First, let’s take a look at what we have. Perfect Portrait is one of
six products that combined give you onOne Software’s Perfect Photo Suite
6. You can buy the whole bundle or you can buy just the individual
products that you like. And while I’m not going to address the other
products here, let me just add kudos to onOne for using the same
interface for each product, something you’d think would be automatic
with software suites but sadly is not.What Perfect Portrait claims to do is to quickly and easily retouch not just one but multiple faces in an image by automatically recognizing not only the faces in the image but the eyes and lips also so they get their own treatment. Of course, if that isn’t to your liking, you can dig deeper into the tools and make manual adjustments. Default settings are those that the manufacturer has determined will work in most situations but you can set your own presets. For example, you may want to go a little heavier on teenage girls than executive men in their 40s, so you can save these settings. There are several presets for Female, Male, Children, and Group already included.

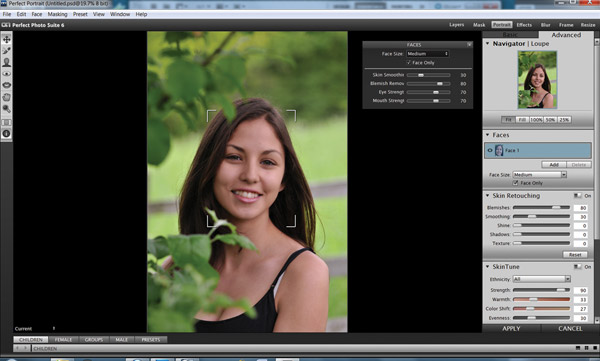
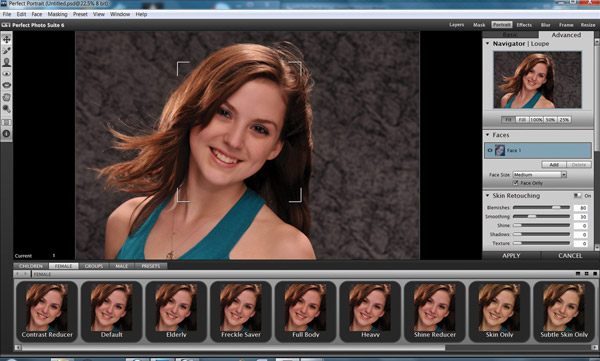
Here’s the very simple and organized
interface you see when you open an image in Perfect Portrait. Tools are
on the left, sliders on the right. The brackets on the image show the
face selected, the hot buttons under the Navigator allow you to quickly
move in tight on the face and if a face was not detected you can
manually select it. The floating palette contains fine-tuning options
that change with the tool you’ve selected. Model: Gabrielle Valesco.
All Photos © Steve Bedell
All Photos © Steve Bedell

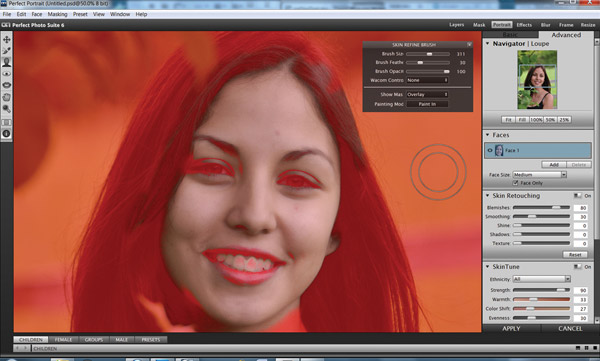
Changing the view from Current to Overlay
allows you to see the mask that was automatically applied and to make
changes to it if desired.

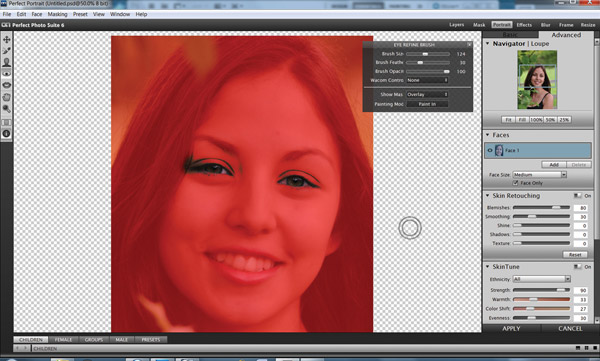
The view changes with each tool you select. Here I’m using the Eye Refine Brush so it automatically shows me the eye masking.
Perfect Portrait gives you several workflow options as well. It is a
stand-alone program but can also open in Aperture, Lightroom, or
Photoshop. I like having this option and since I had the opportunity to
use both the entire suite and just Perfect Portrait, I can tell you that
the workflow is a little different in each.In the suite, you open the program and it goes to the Layers section by default. Then you open an image and use whichever program you’d like. If you opt to go with just Perfect Portrait without the suite, when you open the program you are first asked to open an image and then it opens the image in the program. No big deal, you say? Well, maybe not on the beginning part but each time you are done working on an image, after you save it, the program closes and you have to go through the process again! I found that to be both annoying and slower than just opening images in an already open program.
Let’s go through a sample workflow situation here on a single image using Adobe Lightroom. The program suggests you do any major color corrections and tonal adjustments first in your program of choice, a little strange because then the program will automatically make color adjustments. Maybe the emphasis here is on major. I found the easiest way was to import the file in Lightroom, do any quick adjustments there, then go to Perfect Portrait from the File/Plugin Extras menu. The program will automatically go to work on your image and if you like what you see, you’re done! If you think it should be fine-tuned, choose one of the many presets included under the proper category. For example, if you’re retouching a man’s portrait, there are 12 presets included that range from Default, Elderly, Twilight, Warm, and more. The default menu shows up as a thumbnail bar across the bottom of the program and you can click on and apply whichever one you feel suits the image best. Once you’ve got the basics done, you can either quit there or use the tools to do more work.

If the default enhancements aren’t to your
liking, you can choose from several preset looks that come with the
program or save your own. Hovering over each preset gives you a larger
sample and a short explanation. Model: Faith Dittmar.
Usually the first tool I’d grab would be the Retouch Brush, which is
similar to the Healing Brush in Photoshop. It works really fast, and can
be used to either dot out blemishes or drag over an area like bags
under the eyes. You can vary the opacity and also adjust brush size
using the bracket keys. I found it did a really great job of cleaning up
blemishes and keeping the skin realistic looking. There is also
pressure control for Wacom tablets. Then you can move to the Refine
Brush for the skin, eyes, and mouth if you feel the need to make
adjustments to those areas.One thing I found very useful was the ability to see just what the program was masking out using the Overlay view. Once again, if you are happy with the area the program selected, then leave it alone. If not, you can paint in and out using the Brush tool to have the exact area you want.
When you are done refining your image with the tools, then you advance to the slider menus on the right side of the interface. Also there you’ll find a Navigator and hot keys to select the face magnification, a Layer palette for each face, and sliders for fine-tuning skin color, shine, and other features.
I found the Face Size feature perhaps incorrectly named. Under that menu it lists Small, Medium, Large, and Extra Large, like you’re buying a man’s shirt. When I first saw it, I thought maybe it changed the shape of the face. Not so, as already noted. What it does is define how tightly or loosely you’d like the automatic face detection feature to work. Small will crop in really closely while Extra Large will stray further into the neck, hair, and other features. While I think it’s a good idea, especially if you’re trying to batch process images and don’t want to look at everyone, maybe either a number system or words like Tight or Loose would make more sense.

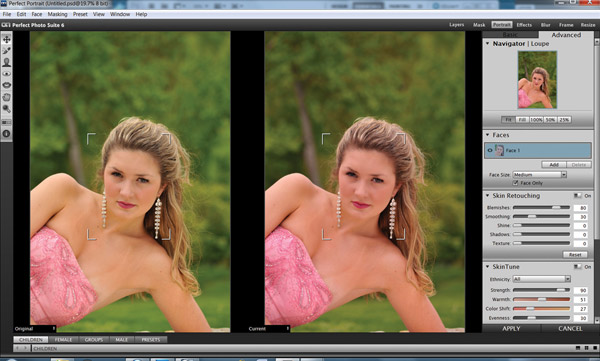
Several split-screen viewing options are
available so you can see not just the retouching but changes in color
and contrast to the image. Model: Kate Consavage.
Once you have fine-tuned an image and gotten it just the way you
like, you may not want to go through all that again on similar images.
Or you may just want to save your work as a “look” for your brand. No
fear. You can save and label all the work you’ve just done as a custom
preset to be called up whenever you’d like.Let’s take a look now at how Perfect Portrait handles multiple faces in an image. When you open an image with multiple faces, the software automatically detects each face and places it on its own layer. If for some reason it missed a face, usually because it was not facing the camera, you can add the face manually. I did try to see how it would do with an image with 11 faces in a full-length pose. No faces were selected, so there are limits! But I then pulled up an image with three faces and it worked just fine. You can work on each face on its own layer independently.
You also have options when saving the image. You can just hit the Save button and your file will be saved as a PSD layer, your original file on the bottom layer and the retouched file on top. This is in keeping with nondestructive editing so your untouched original can always be accessed. You also have the option of using Export from the File menu to save as a TIFF or flattened JPEG file.

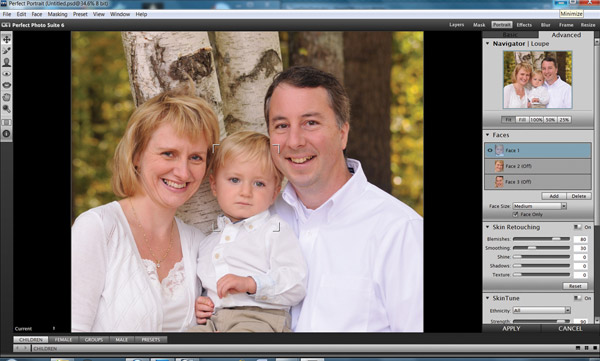
When a file is selected with more than one
face, Perfect Portrait detects each face and places it on its own layer
so you can make adjustments to each face individually. If a face was
missed because it was too small or not facing the camera, you can
manually add it. Models: The Tromba Family.
Now let’s talk about batch processing and how it can affect your
workflow. Many photographers like to “pretouch” their images, or do
modest retouching of each image from a session before they show them to a
client. Since most days I barely have enough time to eat my bowl of
Frosted Mini-Wheats in the morning, I’m not a big fan of retouching 50
images when the client may only buy two or three of them. Seems like a
significant amount of time spent with little reward. That may change
now.You see, I can open Lightroom, import a folder of images, export them to Perfect Portrait, choose the options I’d like, and press Export once again. Voilà! All images are pretouched. I put four JPEGs in a folder to test and it went through them flawlessly. It did take a little while even with JPEGs so if you have lots of images to do you may want to hit the Export button and then go have your Frosted Mini-Wheats! And speaking of time, I have a rather new computer I used to test this. It has 4GB of RAM and a quad processor so take the minimum specs required pretty seriously, as this program does take some processing power.
Like most current software companies, onOne has extensive support online. They have a Knowledge Base that allows you to search for answers to common questions and e-mail support. They also have a feature I found most useful, onOne University, which has many tutorial videos. Because of the newness of the program, there are only a few on Perfect Portrait, but they do a good job of explaining the basics and will get you up and running quickly.

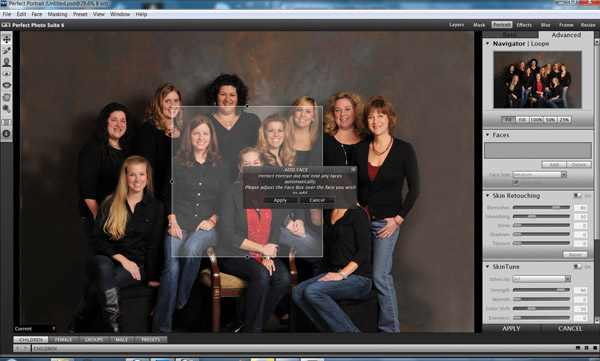
When faces are too small for the program
to detect, a bounding box pops up that allows you to select them
yourself. In cases like this image with 11 people, it’s probably faster
and more accurate to manually retouch.
I believe onOne has created an application that can be of great
benefit to both amateurs and professionals. Amateurs will appreciate the
short learning curve and being able to quickly improve their images.
Professionals will be able to integrate Perfect Portrait into their
workflow for several applications, from pretouching to fully finished
files, using it either as a stand-alone product or with their usual
product of choice like Aperture, Lightroom, or Photoshop. In particular,
the ability to batch process files without having to stop for each
image is of great value.Note: It is recommended that you use an Intel Core 2 Duo, Xeon, or better processor. In addition, 8GB of RAM is recommended, while 4GB of RAM is the minimum you should use.
Perfect Portrait sells for $99.95, with an upgrade price of $69.95. Perfect Photo Suite 6 sells for $299.95, with an upgrade price of $149.95. For more information, visit onOne Software’s website at: www.ononesoftware.com.
No comments:
Post a Comment