Photo Retouching
For months, I've been daydreaming about doing some retouch work in
Fashion. I do it all the time in other work. Remove a double chin,
whiten those teeth, take that tree out of the background kind of
stuff . Then I met California fashion photographer Tyra Hansen on Facebook. She was wondering if I would like to do some retouching for her. (Thank you, Tyra) The shots are of the lovely Dee Sproles (model) and here are the results.
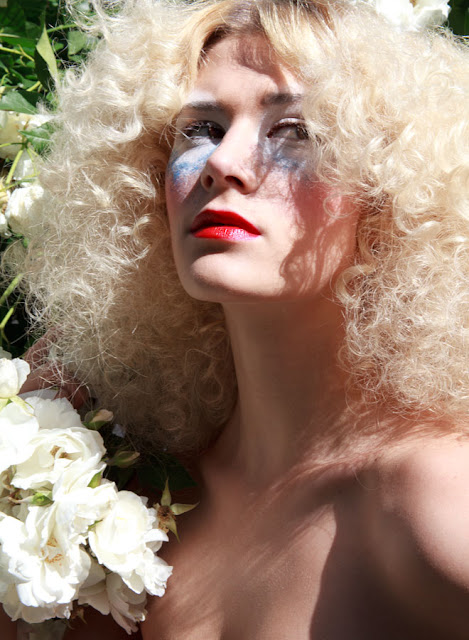
1. Original raw file shot Dee by Tyra (above) and was graciously given a free hand to be as creative as I liked. My goal was to create something slightly ethereal or ghostly. I also wanted to experiment with a new techniques I read in Advanced Photoshop Magazine (awesome magazine)... a quick Bokeh effect.
2. I work in Photoshop CS5 with just a mouse... I should use a tablet but I don't like them that much.
I invested in the plug-in Color EFEX Pro from Nik Software a few months ago and was blown away. Note: I put an (EFEX) notation when I use one in this tute. Here, I just went around the image, cleaning up loose hair, any blemishes, etc.
3. Here, I used a Glamour Glow (EFEX) on a new layer and adjusted the opacity until I liked the result. Also did a little highlighting (like the bottom lip) on areas with the Dodge and Burn tool.
4. Then I wanted to get a cross processed effect which attained by
creating a subtle S-CURVE in CURVES. After which I went in the COLOR
BALANCE and played around with the green. cyan and yellow until saw what
I was after.
5. Always been curious about Bokeh and found a great tutorial in Advanced Photoshop magazine. The effect was created rather quickly with a custom brush.
Just went with a highly saturated cross processed look with this one and threw a little Bokeh effect in for fun.
stuff . Then I met California fashion photographer Tyra Hansen on Facebook. She was wondering if I would like to do some retouching for her. (Thank you, Tyra) The shots are of the lovely Dee Sproles (model) and here are the results.
1. Original raw file shot Dee by Tyra (above) and was graciously given a free hand to be as creative as I liked. My goal was to create something slightly ethereal or ghostly. I also wanted to experiment with a new techniques I read in Advanced Photoshop Magazine (awesome magazine)... a quick Bokeh effect.
2. I work in Photoshop CS5 with just a mouse... I should use a tablet but I don't like them that much.
I invested in the plug-in Color EFEX Pro from Nik Software a few months ago and was blown away. Note: I put an (EFEX) notation when I use one in this tute. Here, I just went around the image, cleaning up loose hair, any blemishes, etc.
3. Here, I used a Glamour Glow (EFEX) on a new layer and adjusted the opacity until I liked the result. Also did a little highlighting (like the bottom lip) on areas with the Dodge and Burn tool.
5. Always been curious about Bokeh and found a great tutorial in Advanced Photoshop magazine. The effect was created rather quickly with a custom brush.
The final image. I used a simple white gradient to soften the whole
image and leave room for any future typography. Below are some
additional images I did for Tyra.
Just went with a highly saturated cross processed look with this one and threw a little Bokeh effect in for fun.
This last one, I discovered the power of the Lens Correction feature
(amazing) but that is a tale for another day. Thanks for joining me.
Look forward to your feedback/thoughts/comments/criticisms.


No comments:
Post a Comment