How to create the hazy look
This article is written by a member of our expert
community. It expresses that member’s views only. We welcome other
perspectives. Here’s how to contribute to EDU.
The hazy, washed-out look is in right now and, judging by the amount of questions I see floating around the Internet, it has got a lot of photographers confused as to how to go about creating it. As we will see, it’s a look that’s easy and quick to get in post production.

Here is the color before image of Talisa that we will be working on.

Next is the image after applying a black and white adjustment layer. I just adjusted the sliders to get a pleasing conversion. You can use any B&W conversion you want for this step.

I then added a curves adjustment layer and pulled the left anchor point up quite a bit. When you pull the left anchor point up you will start to see the hazy effect appear in the shadows and in the mid tones.

Next I added a couple new anchor points around the shadows and pulled them down a bit. As you do this move you will see the hazy effect manifest itself more in the shadows as the shadow contrast is further reduced, and you will also see some amount of contrast return to the mid tones.

The final curves adjustment involves putting a couple of anchor points near the highlights and pushing them up just a bit. This served to lighten the mid tones and to reduce the contrast in the extreme highlights, which makes the highlight transition areas appear smoother.

And that’s it for the hazy look. I should note that I did a couple more artistic tweaks on the final image that is above.
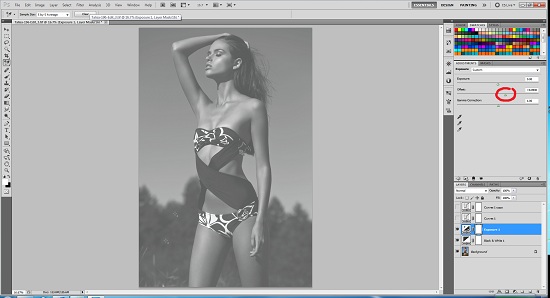
As with most operations in Photoshop, there is usually more than one way to do things while still getting very similar results. Using the offset slider in an Exposure adjustment layer, and the black point output slider in a Levels adjustment layer, are two additional ways to get a similar effect. The Exposure and Levels methods are, however, significantly more limiting than using a curves layer. You can always get the same results using curves that you can get using an Exposure or Levels Layer, but not vice versa. With the Levels and Exposure methods you have just one slider to play with, but with the Curves method you can add up to 16 points to the curve, and tweak them however you want.
Below are examples of the image with Exposure and Level adjustments. I circled the relevant slider on each of the layers, and also included a curves adjustment below each of them to show you how you would create a Curve layer to get a similar result.
Exposure


Levels


The hazy, washed-out look is in right now and, judging by the amount of questions I see floating around the Internet, it has got a lot of photographers confused as to how to go about creating it. As we will see, it’s a look that’s easy and quick to get in post production.

Here is the color before image of Talisa that we will be working on.

Next is the image after applying a black and white adjustment layer. I just adjusted the sliders to get a pleasing conversion. You can use any B&W conversion you want for this step.

I then added a curves adjustment layer and pulled the left anchor point up quite a bit. When you pull the left anchor point up you will start to see the hazy effect appear in the shadows and in the mid tones.

Next I added a couple new anchor points around the shadows and pulled them down a bit. As you do this move you will see the hazy effect manifest itself more in the shadows as the shadow contrast is further reduced, and you will also see some amount of contrast return to the mid tones.

The final curves adjustment involves putting a couple of anchor points near the highlights and pushing them up just a bit. This served to lighten the mid tones and to reduce the contrast in the extreme highlights, which makes the highlight transition areas appear smoother.

And that’s it for the hazy look. I should note that I did a couple more artistic tweaks on the final image that is above.
As with most operations in Photoshop, there is usually more than one way to do things while still getting very similar results. Using the offset slider in an Exposure adjustment layer, and the black point output slider in a Levels adjustment layer, are two additional ways to get a similar effect. The Exposure and Levels methods are, however, significantly more limiting than using a curves layer. You can always get the same results using curves that you can get using an Exposure or Levels Layer, but not vice versa. With the Levels and Exposure methods you have just one slider to play with, but with the Curves method you can add up to 16 points to the curve, and tweak them however you want.
Below are examples of the image with Exposure and Level adjustments. I circled the relevant slider on each of the layers, and also included a curves adjustment below each of them to show you how you would create a Curve layer to get a similar result.
Exposure


Levels


No comments:
Post a Comment