How to make a ‘High Dynamic Range’ (HDR) image from a single RAW image
This technique allows you to create a High Dynamic Range (HDR)
effect using a single photo, as long as you have taken it in RAW
format. It is useful for high contrast images, where no matter how you
expose the image some parts are too dark and some highlights are too
bright.
You may ask why not just use dodge and burn? The answer is, because at the point you’re editing an image, it’s often too late. If the clouds in the sky are “burnt out,” no amount of darkening is going to restore what has been lost. If you have the RAW file, however, that information is still preserved, unless your initial exposure was wildly off.
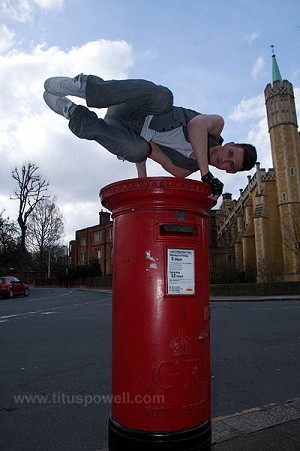
BEFORE:

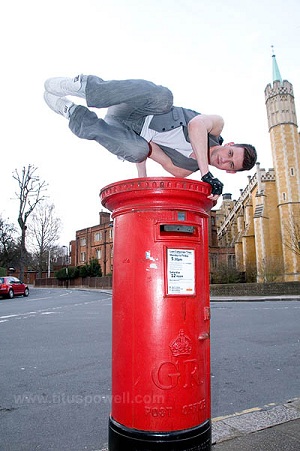
AFTER:

Here’s the technique:
1. Open the image as a RAW file in Photoshop. If your version of Photoshop doesn’t let you open the RAW file directly, download a free utility called Adobe DNG Converter, and run that on the RAW file(s) first to create .DNG versions, which Photoshop should then be able to open.
When you open the file, you are presented with a dialogue like this:

Notice the “Exposure” slider. Try sliding it in both directions. Different parts of the image will be correctly exposed (not too bright and not too dark) at different positions on the scale. The goal of this technique is to make the whole image correctly exposed by combining different versions of the same image.
2. Move the Exposure slider to a position where *most* of the image is correctly exposed. Don’t worry if some parts are too bright or too dark. Just pick a position where as much of the image as possible is correctly exposed. Click “Open Image.” Now the image will open in Photoshop ready for editing.
3. From the File menu, click “Save As.” Change the “format” box to “Photoshop,” so that it saves it as a .PSD file. Call the file “Base.psd” and save it somewhere convenient. Now close the image.
4. Open the RAW/DNG file once again. You’ll get the same RAW dialog as before, except it will have remembered your selected Exposure value from before. Remember this base value; you’ll need it again in a minute.
5. Notice which parts of the image are too bright. Adjust the Exposure down until those areas are correctly exposed, even though the rest of the image will then look too dark. This should be about 0.6 less than the base value. Click “Open Image” and then save as a .PSD file like before, except this time call the image “Highlights.psd.” Close the image.
6. Open the RAW/DNG file again and move the Exposure slider back to your first, base value. Notice which parts of the image are too shadowy. Now adjust the Exposure slider up until those dark parts are correctly exposed, even though the rest of the image will look overexposed. This should be about 0.6 more than the base value. Click “Open Image” and then save as a .PSD file again, this time calling the image “Shadows.psd.” Close the image.
You should now have three images with different exposures, called Highlights, Base and Shadows. For example:

7. Open all three images in Photoshop. Switch to the one called Highlights, select all (“Select” menu… “All”), copy (“Edit” menu… “Copy”), switch to the image called Base, and then paste (“Edit” menu… “Paste”).
8. Click the “Add Layer Mask” icon to add a mask. If your Layers window isn’t visible, you can display it by going to the “Windows” menu and selecting “Layers.” The Layer Mask icon is the one at the bottom that looks like a white circle in a grey rectangle. This:

Once you click “Add Layer Mask,” a white square will appear next to Layer 1. This is the mask.
9. From the “Image” menu, click “Adjustments” and then “Invert.” The mask should go black, like this:

10. Rename the layer (by double clicking on its name) from “Layer 1” to “Highlights.”
11. Switch to the Shadows image, select all, copy, switch back to the Base image, and paste. Click “Add Layer Mask” again and invert the mask again to make it black. Rename this layer “Shadows.” The layer stack should now look like this:

What you’ve done is stack the three images on top of each other, with the base one at the bottom. Layer masks control the transparency of an image. Areas that are white are not transparent, and areas that are black are fully transparent. So because we’ve made the masks for the top two layers black (fully transparent), they are in effect invisible at the moment. What you see is just the bottom layer, and our base exposure.
12. Here comes the magic of layer masks. Select the mask for the Highlights layer by clicking on it (the black square, not the thumbnail of the image itself). Next, make sure the current foreground color is set to white (pressing “D” should do it.) It is shown in this icon:
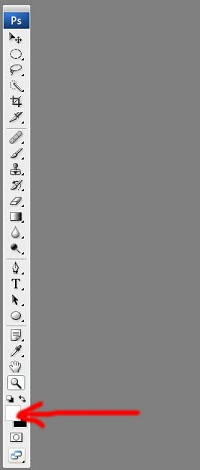
Now select the Brush tool by pressing “B” or clicking this icon:

13. Zoom in to 100% on the image and start painting the areas of the image that are too bright. You will need to adjust the brush size as you go along. As you paint over the overexposed parts of the image, they will miraculously be restored to the correct exposure.
What’s actually happening here is you’re selectively painting out the transparency of the mask for the hidden Highlights layer, making it visible again in those areas you paint.
You may find that the brush stroke brightens it too much. In that case, immediately click the “Edit” menu and then “Fade,” and adjust the slider until you are happy with the amount to apply. This extremely useful option reduces the effect of whatever your last action was.
14. Once you’ve restored the overexposed highlights, select the mask for the Shadows layer by clicking on the black square for that layer. Now paint over the areas of the image that are too dark. You will see them brighten where you paint, as parts of the Shadows layer are made visible.
The layer stack will now show the white you painted on the two masks, illustrating the areas of the Shadows and Highlights layers that are showing, versus those that are still black and thus hidden. Something like this:

And here is what the image itself looks like now:

This particular image is still a bit bright in the clouds, so I went back to the RAW/DNG file and made a new image with an even lower Exposure value, to bring the detail back in the clouds. With this edited in too, plus some minor retouching such as cloning sky over the “fringing” effect, we have the finished image:

Note that if you are converting your finished image to .JPG format, you need to use “Save For Web” to convert to the right color space.
You may ask why not just use dodge and burn? The answer is, because at the point you’re editing an image, it’s often too late. If the clouds in the sky are “burnt out,” no amount of darkening is going to restore what has been lost. If you have the RAW file, however, that information is still preserved, unless your initial exposure was wildly off.
BEFORE:
AFTER:
Here’s the technique:
1. Open the image as a RAW file in Photoshop. If your version of Photoshop doesn’t let you open the RAW file directly, download a free utility called Adobe DNG Converter, and run that on the RAW file(s) first to create .DNG versions, which Photoshop should then be able to open.
When you open the file, you are presented with a dialogue like this:
Notice the “Exposure” slider. Try sliding it in both directions. Different parts of the image will be correctly exposed (not too bright and not too dark) at different positions on the scale. The goal of this technique is to make the whole image correctly exposed by combining different versions of the same image.
2. Move the Exposure slider to a position where *most* of the image is correctly exposed. Don’t worry if some parts are too bright or too dark. Just pick a position where as much of the image as possible is correctly exposed. Click “Open Image.” Now the image will open in Photoshop ready for editing.
3. From the File menu, click “Save As.” Change the “format” box to “Photoshop,” so that it saves it as a .PSD file. Call the file “Base.psd” and save it somewhere convenient. Now close the image.
4. Open the RAW/DNG file once again. You’ll get the same RAW dialog as before, except it will have remembered your selected Exposure value from before. Remember this base value; you’ll need it again in a minute.
5. Notice which parts of the image are too bright. Adjust the Exposure down until those areas are correctly exposed, even though the rest of the image will then look too dark. This should be about 0.6 less than the base value. Click “Open Image” and then save as a .PSD file like before, except this time call the image “Highlights.psd.” Close the image.
6. Open the RAW/DNG file again and move the Exposure slider back to your first, base value. Notice which parts of the image are too shadowy. Now adjust the Exposure slider up until those dark parts are correctly exposed, even though the rest of the image will look overexposed. This should be about 0.6 more than the base value. Click “Open Image” and then save as a .PSD file again, this time calling the image “Shadows.psd.” Close the image.
You should now have three images with different exposures, called Highlights, Base and Shadows. For example:
7. Open all three images in Photoshop. Switch to the one called Highlights, select all (“Select” menu… “All”), copy (“Edit” menu… “Copy”), switch to the image called Base, and then paste (“Edit” menu… “Paste”).
8. Click the “Add Layer Mask” icon to add a mask. If your Layers window isn’t visible, you can display it by going to the “Windows” menu and selecting “Layers.” The Layer Mask icon is the one at the bottom that looks like a white circle in a grey rectangle. This:
Once you click “Add Layer Mask,” a white square will appear next to Layer 1. This is the mask.
9. From the “Image” menu, click “Adjustments” and then “Invert.” The mask should go black, like this:
10. Rename the layer (by double clicking on its name) from “Layer 1” to “Highlights.”
11. Switch to the Shadows image, select all, copy, switch back to the Base image, and paste. Click “Add Layer Mask” again and invert the mask again to make it black. Rename this layer “Shadows.” The layer stack should now look like this:
What you’ve done is stack the three images on top of each other, with the base one at the bottom. Layer masks control the transparency of an image. Areas that are white are not transparent, and areas that are black are fully transparent. So because we’ve made the masks for the top two layers black (fully transparent), they are in effect invisible at the moment. What you see is just the bottom layer, and our base exposure.
12. Here comes the magic of layer masks. Select the mask for the Highlights layer by clicking on it (the black square, not the thumbnail of the image itself). Next, make sure the current foreground color is set to white (pressing “D” should do it.) It is shown in this icon:
Now select the Brush tool by pressing “B” or clicking this icon:
13. Zoom in to 100% on the image and start painting the areas of the image that are too bright. You will need to adjust the brush size as you go along. As you paint over the overexposed parts of the image, they will miraculously be restored to the correct exposure.
What’s actually happening here is you’re selectively painting out the transparency of the mask for the hidden Highlights layer, making it visible again in those areas you paint.
You may find that the brush stroke brightens it too much. In that case, immediately click the “Edit” menu and then “Fade,” and adjust the slider until you are happy with the amount to apply. This extremely useful option reduces the effect of whatever your last action was.
14. Once you’ve restored the overexposed highlights, select the mask for the Shadows layer by clicking on the black square for that layer. Now paint over the areas of the image that are too dark. You will see them brighten where you paint, as parts of the Shadows layer are made visible.
The layer stack will now show the white you painted on the two masks, illustrating the areas of the Shadows and Highlights layers that are showing, versus those that are still black and thus hidden. Something like this:
And here is what the image itself looks like now:
This particular image is still a bit bright in the clouds, so I went back to the RAW/DNG file and made a new image with an even lower Exposure value, to bring the detail back in the clouds. With this edited in too, plus some minor retouching such as cloning sky over the “fringing” effect, we have the finished image:
Note that if you are converting your finished image to .JPG format, you need to use “Save For Web” to convert to the right color space.
No comments:
Post a Comment