Sculpting and painting with light – part 3
Controlling precision with “Hollywood Grids”
I would now like to discuss how to control your light with greater precision by mixing “Hollywood Grids” (Cookies) with:
© Benjamin Kanarek
A Hollywood Grid or (Cookie) is produced by taking a sheet of cardboard or backdrop paper (usually black or dark grey) that can be cut into a square of around 1.0 to 1.5 meters square. You can use a box cutter or scissor to produce the patterns you will introduce on to the cardboard or backdrop paper squares.
Lay the cardboard or paper on the floor and make sure you place something underneath (so as to not to damage your floor). Start cutting out patterns of circles, squares, triangles, diamonds, stars or whatever comes to mind, in different sizes from 2 to 3 centimeters to 10 to 12 cm. Experiment with the different shapes. You might wish to try your cookie cut outs over the whole area. I will explain why in a moment.
I suggest you prepare one flash head with your classic 7 inch diameter diffusion bowl, your snoot and your honeycomb grid in fine, medium and large (grid sizes).
Set up two light stands to support the cardboard or backdrop paper. You might have another makeshift stand that can be used to support your grid vertically on either side. I use standard clothes clips to affix them to the stands. Raise the stands high enough to allow the grid to not touch the floor, unless you wish to shoot through very low. Your height will be determined by the subject orientation to the grid, angle of light source etc.
As a starting point of reference, place your flash head about 50cm or 2 feet from the grid, only using the 7 inch bowl reflector. Turn on the flash unit using the modelling light. If using Hot Lights the same rules apply, but shutter speed will change of course. Darken the room if possible to see the effect of the light on the area you wish to concentrate on.
Start moving the light source up and down in the direction of the subject to see where the light hits. If you want harder patterns, move the light source further away from the subject. If you want more diffused light, move the head closer to the patterns. If you don’t like one section of the patterns, move your grid up or down or move your light to where you see something you like.
Hollywood grids with Honeycomb grids
Here is where things get really interesting. You will notice that with the bare head, there is a lot going on and the light spread is considerable and covers a large area of the backdrop. Introduce a honeycomb medium grid as a starting point and see how much additional contrast has been introduced. The area of coverage has been reduced substantially, adding greater drama to the image. Experiment in the same manner as above, but also experiment with different *honey comb grid sizes.
Hollywood grids with snoots
Snoots are a compromise between open bowl lighting and honeycomb grid lighting. You will also see a more evident circle than with a Hollywood Grid. It is important to note where you meter for these images, as hot spots are a lot more evident and drop off is extreme. You must consider dynamic range when using this technique. So check your curves.
Play around and discover your own techniques
I utilize a selective lighting exercise in my shoots in order to explore and discover which types of lights I want to use on which parts of the subject I’m shooting.
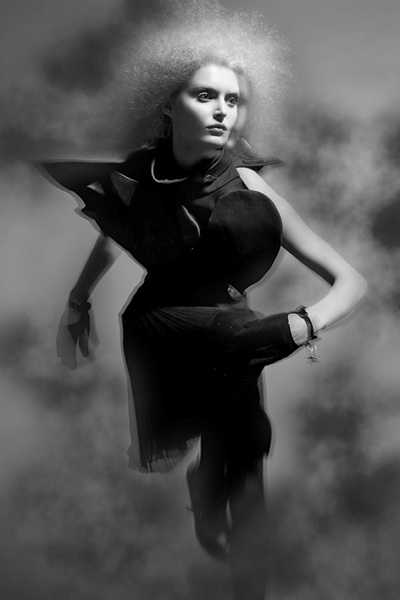
Model Christelle Lefranc in Guardian Angel © Benjamin Kanarek
As we all know, continuous lights and flash can have very different outcomes—knowing how to control those results is part of the challenge in adding dimension to your images.
I have been able to recreate, to a certain degree, the tilt shift look in an image without using a tilt shift lens, by simply choosing which part of the subject will be sharp and which will be blurred. You can see an example of this in the shoot I did for Spoon Magazine in this video. You can watch how I attempt an effect of having a subtle lower half blurred, even when shooting perpendicular to the subject.
To give an example: to obtain this effect from the waist down, I will light the upper half of the body with flash and the lower half with either hot lights or kino light. I will shoot at around 1/4 to 1/15th of a second. As I am shooting the subject, I will focus on the eyes and, just as I am pressing the shutter, I will do rapid pivot downwards to achieve this effect. Playing with the rapidity will render different outcomes.
It has taken me years to perfect this, and I have had some success in doing so. Although not perfect, it is something that is difficult to replicate in Photoshop, and it can give you some very strong 3 dimensional effects. Nonetheless, you can also see this technique employed in this video, where I have flagged the flash and use Mandarine Tungsten light on the lower half of the models body.
Have fun and experiment. The sky is the limit!
This article is republished from Benjamin Kanarek’s blog: What Kinds of Lighting Accessories are Needed to Sculpt or Paint with Light?
photo editing website
I would now like to discuss how to control your light with greater precision by mixing “Hollywood Grids” (Cookies) with:
- bare head flash units
- snoots
- honeycomb grid
© Benjamin Kanarek
A Hollywood Grid or (Cookie) is produced by taking a sheet of cardboard or backdrop paper (usually black or dark grey) that can be cut into a square of around 1.0 to 1.5 meters square. You can use a box cutter or scissor to produce the patterns you will introduce on to the cardboard or backdrop paper squares.
Lay the cardboard or paper on the floor and make sure you place something underneath (so as to not to damage your floor). Start cutting out patterns of circles, squares, triangles, diamonds, stars or whatever comes to mind, in different sizes from 2 to 3 centimeters to 10 to 12 cm. Experiment with the different shapes. You might wish to try your cookie cut outs over the whole area. I will explain why in a moment.
I suggest you prepare one flash head with your classic 7 inch diameter diffusion bowl, your snoot and your honeycomb grid in fine, medium and large (grid sizes).
Set up two light stands to support the cardboard or backdrop paper. You might have another makeshift stand that can be used to support your grid vertically on either side. I use standard clothes clips to affix them to the stands. Raise the stands high enough to allow the grid to not touch the floor, unless you wish to shoot through very low. Your height will be determined by the subject orientation to the grid, angle of light source etc.
As a starting point of reference, place your flash head about 50cm or 2 feet from the grid, only using the 7 inch bowl reflector. Turn on the flash unit using the modelling light. If using Hot Lights the same rules apply, but shutter speed will change of course. Darken the room if possible to see the effect of the light on the area you wish to concentrate on.
Start moving the light source up and down in the direction of the subject to see where the light hits. If you want harder patterns, move the light source further away from the subject. If you want more diffused light, move the head closer to the patterns. If you don’t like one section of the patterns, move your grid up or down or move your light to where you see something you like.
Hollywood grids with Honeycomb grids
Here is where things get really interesting. You will notice that with the bare head, there is a lot going on and the light spread is considerable and covers a large area of the backdrop. Introduce a honeycomb medium grid as a starting point and see how much additional contrast has been introduced. The area of coverage has been reduced substantially, adding greater drama to the image. Experiment in the same manner as above, but also experiment with different *honey comb grid sizes.
Hollywood grids with snoots
Snoots are a compromise between open bowl lighting and honeycomb grid lighting. You will also see a more evident circle than with a Hollywood Grid. It is important to note where you meter for these images, as hot spots are a lot more evident and drop off is extreme. You must consider dynamic range when using this technique. So check your curves.
Play around and discover your own techniques
I utilize a selective lighting exercise in my shoots in order to explore and discover which types of lights I want to use on which parts of the subject I’m shooting.
Model Christelle Lefranc in Guardian Angel © Benjamin Kanarek
As we all know, continuous lights and flash can have very different outcomes—knowing how to control those results is part of the challenge in adding dimension to your images.
I have been able to recreate, to a certain degree, the tilt shift look in an image without using a tilt shift lens, by simply choosing which part of the subject will be sharp and which will be blurred. You can see an example of this in the shoot I did for Spoon Magazine in this video. You can watch how I attempt an effect of having a subtle lower half blurred, even when shooting perpendicular to the subject.
To give an example: to obtain this effect from the waist down, I will light the upper half of the body with flash and the lower half with either hot lights or kino light. I will shoot at around 1/4 to 1/15th of a second. As I am shooting the subject, I will focus on the eyes and, just as I am pressing the shutter, I will do rapid pivot downwards to achieve this effect. Playing with the rapidity will render different outcomes.
It has taken me years to perfect this, and I have had some success in doing so. Although not perfect, it is something that is difficult to replicate in Photoshop, and it can give you some very strong 3 dimensional effects. Nonetheless, you can also see this technique employed in this video, where I have flagged the flash and use Mandarine Tungsten light on the lower half of the models body.
Have fun and experiment. The sky is the limit!
This article is republished from Benjamin Kanarek’s blog: What Kinds of Lighting Accessories are Needed to Sculpt or Paint with Light?
photo editing website
No comments:
Post a Comment