Sculpting and painting with light – part 1
I like to look at lighting in one of two ways: as sculpting or
as painting. “Sculpting” light for when you start with an overall wash
of light, and “painting” light for when you commence in complete
darkness. Given this way of looking at it, I would like to suggest
lighting systems and accessories that may assist you in attaining your
final goals in lighting your subject or scenario.
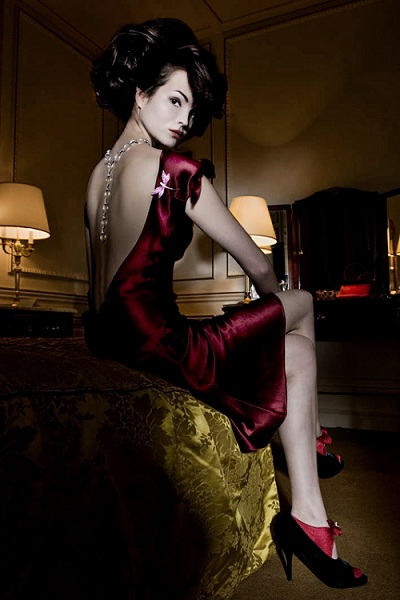
© Benjamin Kanarek
As a preface, these examples relate more to interior lighting situations, but they can also apply to close-quarter outdoor scenarios. If shooting outdoors, you will need a much more powerful lighting setup to compete with the light already surrounding you.
Choose a lighting system that’s packaged with the accessories you need
There are several lighting systems out there, and most of them provide panoplies of lighting accessories and add-ons. If they don’t have what you want, you can often use other manufacturers’ accessories and adapt them to your systems mounting hardware. However, I would suggest that you find a brand that offers the modifiers necessary to achieve your present and future lighting goals. I have designed my own system for one of my lighting techniques, and this system does not exist in the market place.
You may wish to consider getting either:
My own personal kit, which I use for testing and for my personal projects, includes:
Umbrellas are akin to sculpting, while highly focused snoots and honeycomb grids are more akin to painting. However, even those tools may not give you the desired effect, as they cast a very definitive circle on to the photo landscape. That is where the art of dodging with scrims come in to play.
Using scrims to redirect or block light
I have a multitude of black scrims which can cover any part of the umbrella or soft box that I wish to obscure. They’re made of black material and are attached to the umbrella or soft box with either Velcro or gaffers tape. I have several home-made scrims anywhere from 30 cm to 1 meter square, as well as home-made cones and black card mini scrim modifiers. A scrim is a panel that can be used to either redirect (white) or block (black) light from hitting an object.
Scrims can be shaped any way you desire, and can be done so using wire hangers or wires to construct the shape of the modifier you wish to employ. Of course, the distance from the light source will have a major effect on how soft or sharp the gradation from dark to light will appear in your image. That is where experimentation comes into play.
Alongside the use of scrims, you may also wish to apply a technique that I have used called “Controlled Vignetting.” By moving an opaque object near your lens you can add a further dimension to your photo. I often use my hands, but I’ve also used plants, vases and glasses. I have also used semi opaque scrims to affect the softness and hardness of my light source.
One of the problems with the use of scrims is the need for stands to support them. So be prepared to buy several. You can purchase clips at most hardware stores.
Umbrella and light box lighting
When attempting to control lighting, it is important to decide which part of the subject area you wish to light, or which sector will have a greater amount of light (which the eyes will be drawn to). You can consider it the other way as well—focusing on which part of the image will be shaded with less light. That is where the “Yin Yang” principal of lighting comes in. I believe that contrast makes images interesting. The possibilities are infinite.

© Benjamin Kanarek
When using a bare umbrella or light box, the light is distributed quite predictably. I suggest you:
Here is where some of the fun begins:
You may also consider applying the same technique for the background light as well. However, in this case you may wish to move the light source around to see the effect on the overall image. If there are ambient light sources, you may consider using them to add realism to the image.
This article is republished from Benjamin Kanarek’s blog: What Kinds of Lighting Accessories are Needed to Sculpt or Paint with Light?
Editing website
© Benjamin Kanarek
As a preface, these examples relate more to interior lighting situations, but they can also apply to close-quarter outdoor scenarios. If shooting outdoors, you will need a much more powerful lighting setup to compete with the light already surrounding you.
Choose a lighting system that’s packaged with the accessories you need
There are several lighting systems out there, and most of them provide panoplies of lighting accessories and add-ons. If they don’t have what you want, you can often use other manufacturers’ accessories and adapt them to your systems mounting hardware. However, I would suggest that you find a brand that offers the modifiers necessary to achieve your present and future lighting goals. I have designed my own system for one of my lighting techniques, and this system does not exist in the market place.
You may wish to consider getting either:
- A power pack system, and flash heads with modelling lights that plug in to the power unit, or
- Several independent monoblock flash heads with modelling lights
My own personal kit, which I use for testing and for my personal projects, includes:
- 2 Multiblitz Profilux 600 ws monoblocs
- 2 Multiblitz Compact Lite 200 ws monobloc units
- 6 Honey Comb Grids
- 2 snoots
- 2 barn door modifiers
- 4 seven inch silver bowls
- 4 Multiblitz umbrellas
- a Multiblitz 60 cm soft box (which I have only used once)
- multiple black scrims
Umbrellas are akin to sculpting, while highly focused snoots and honeycomb grids are more akin to painting. However, even those tools may not give you the desired effect, as they cast a very definitive circle on to the photo landscape. That is where the art of dodging with scrims come in to play.
Using scrims to redirect or block light
I have a multitude of black scrims which can cover any part of the umbrella or soft box that I wish to obscure. They’re made of black material and are attached to the umbrella or soft box with either Velcro or gaffers tape. I have several home-made scrims anywhere from 30 cm to 1 meter square, as well as home-made cones and black card mini scrim modifiers. A scrim is a panel that can be used to either redirect (white) or block (black) light from hitting an object.
Scrims can be shaped any way you desire, and can be done so using wire hangers or wires to construct the shape of the modifier you wish to employ. Of course, the distance from the light source will have a major effect on how soft or sharp the gradation from dark to light will appear in your image. That is where experimentation comes into play.
Alongside the use of scrims, you may also wish to apply a technique that I have used called “Controlled Vignetting.” By moving an opaque object near your lens you can add a further dimension to your photo. I often use my hands, but I’ve also used plants, vases and glasses. I have also used semi opaque scrims to affect the softness and hardness of my light source.
One of the problems with the use of scrims is the need for stands to support them. So be prepared to buy several. You can purchase clips at most hardware stores.
Umbrella and light box lighting
When attempting to control lighting, it is important to decide which part of the subject area you wish to light, or which sector will have a greater amount of light (which the eyes will be drawn to). You can consider it the other way as well—focusing on which part of the image will be shaded with less light. That is where the “Yin Yang” principal of lighting comes in. I believe that contrast makes images interesting. The possibilities are infinite.
© Benjamin Kanarek
When using a bare umbrella or light box, the light is distributed quite predictably. I suggest you:
- Go out and get some black velvet, or thick black cloth that is large enough to cover the entire surface of the light box or umbrella surface
- Purchase some Velcro
- Cut the cloth into a circle for the umbrella and attach the Velcro to the periphery of the umbrella and cloth circle
- Do the same for the light box
Here is where some of the fun begins:
- Place the cloth scrim template cover over the entire umbrella or soft box and turn on the flash unit, with the modeling light on
- Place the object or person you are wishing to light in the desired place and remove (IE peel back) a sector of the cloth scrim
- See what the light is doing. Rotate the umbrella or soft box and observe the effects on your subject
You may also consider applying the same technique for the background light as well. However, in this case you may wish to move the light source around to see the effect on the overall image. If there are ambient light sources, you may consider using them to add realism to the image.
This article is republished from Benjamin Kanarek’s blog: What Kinds of Lighting Accessories are Needed to Sculpt or Paint with Light?
Editing website
No comments:
Post a Comment